Photoshop tutorial #1: Basics and interface

No matter if you are a photographer, graphic designer or just new in the world of graphic, you will fastly encounter you need an advanced graphic tool like Photoshop. The beginning is never simple, especially that there are so many options. You won't be a pro just overnight, but everyone has to start somewhere.
First look at the interface
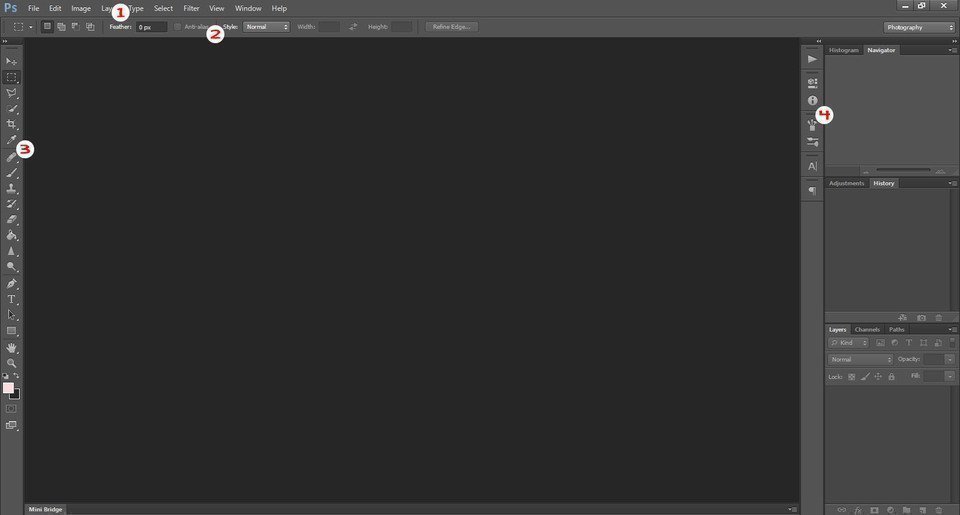
First, let's take a look at the Photoshop's interface to get familiar with its main areas position.

- The main menu - you can find here Options, Filters, Image Adjustments etc.
- Options Bar - this is the place where you can adjust settings that are specified for the active tool you actually use.
- Toolbox - you can find here all available tools in the Photoshop, like a brush, pencil, selection tool, eraser and much more. If the tool has a triangle on the right bottom corner, there is a submenu with familiar tools. Click and hold on to open it.
- Panels - inner Photoshop windows for many different purposes (like Color Panel, Layers Panel or Paths Panel). The good thing is that you can arrange the panels as you want by changing heir position, switching etc.
Create new document
To open a new document, just go to File -> New.. There will be a few options that should be explained.
- Name - the name of your file.
- Width and Height - this are width and height of your document: you can choose between pixels, centimeters, millimeters, inches etc. Pixel is the smallest block of color information than an image is build of and would be the best for internet images or websites, inches or centimeters will be useful for printing.
- Resolution - resolution of your document. For the web, it usually is 72ppi (pixels per inch), because most monitors display images at that resolution. For printing purposes, you should probably use 300ppi, so the image will be much denser and sharper.
- Color mode - the most commonly used are RGB and CMYK.
- RGB - is made up of 3 color channels: Red Green Blue. It's mainly used for any screen purposes, like web design or photos which will never be printed. Unfortunately worth to remember is that not all monitors are display colors the same, for example, green may look different on one computer, and different on another.
- CMYK - is made up of 4 color channels: Cyan, Magenta, Yellow and Black (colors of ink that make up an image in most conventional printers). It's mainly using for printing. Unfortunately, same as in RGB, printers might print your colors slightly different than on your monitor.

Document window
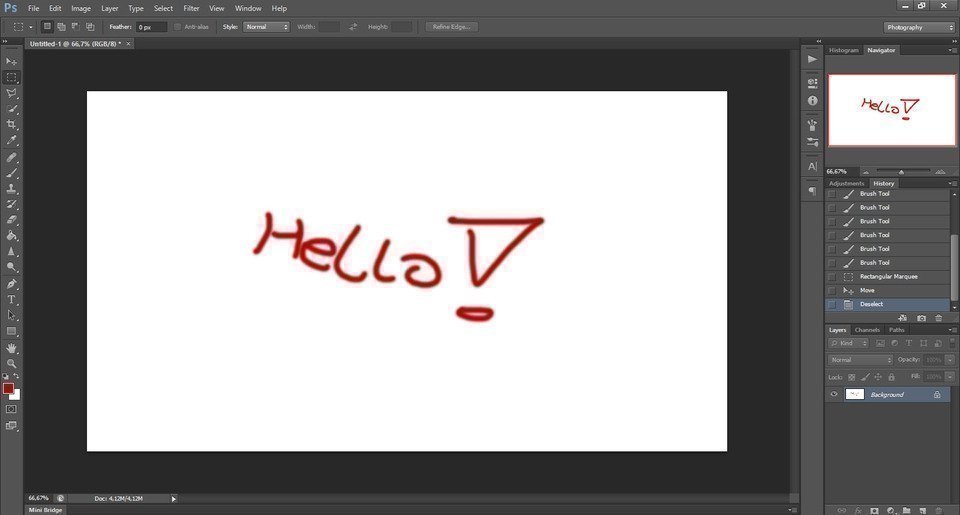
Document window will show you when you open a file or create a new one. This is an actual area you are working on in Photoshop. On the right, you can see a new document, where I wrote "Hello!" using a red brush. You can also have multiple documents open at the same time.
Layers
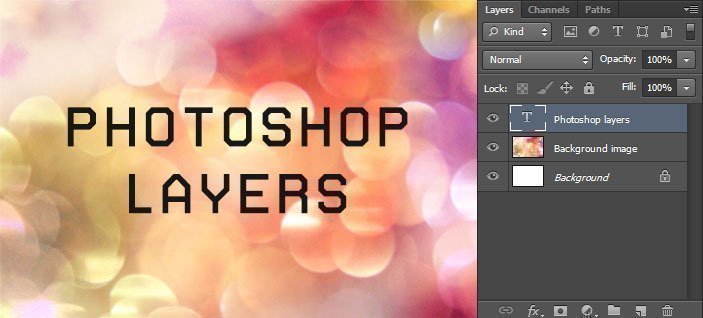
Your document (image) can be made of different layers, for example, one with image and one with text. You can change their order, merge them, blend etc. See the example image below:

As you can see there are three layers: the first from the bottom is just a background layer, which actually is not visible, as the next layer called "background image" covers the whole document. The third layer is a text layer with "Photoshop layers". If you would put the text layer one level down, it would disappear, as the image layer would cover it.
Opacity
The opacity says how much of a given layer we can see: 100% means we can see layer normally, but when we will change it to 50%, we well see through it because it will be transparent. 0% will make it disappear. Let's see our last example, but this time I changed the opacity of the text layer to 50%.

As you can see, the text started to be partly transparent and now we can see through it.
Fill
As you may notice, near the opacity there is also a fill option. It's almost the same that opacity, but it does not affect any additional layer effects. What are layer effects? You will learn that later.

Photoshop tools
There are many different tools in Photoshop for many different purposes. I will try to shortly describe them here. Of course the best knowledge you get if you will also start to play with them on your own.
1. Move Tool
As the name describes, the move tool can be used to move anything and change their position on the current layer. If you select only part of the layer, you can move only that part.
2. Marquee Tools
These tools are using for making selections. There are few different tools hiding in here, two main are:
- Rectangular marquee tool - you can make rectangular selections using this tool.
- Elliptical marquee tool - same as above, but selection will be elliptical.
3. Lasso Tools
Lasso tools are also for making selections, but this time you can select any kind of shapes. There are three different lasso tools:
- Lasso Tool - you can make loose selections using this tool.
- Polygonal LassoTool - you can make strictly linear selections (you draw straight lines to make a selection).
- Magnetic Lasso Tool - this tool allows you to drag your mouse near the boundaries of an image, and it determines where the edges are, and anchor points are placed at regular intervals.
4. Selection Tools
This tools will help you to make selections. There are two tools here:
- Quick Selection Tool - this tool checks object boundaries and make the selection. Just drag over the area you want to select.
- Magic Wand Tool - it makes the selection based on colors and starts in the place you clicked.
5. Crop Tool
You can use the crop tool to slice your image to the desired size. You can do it manually or you can write ratio like 4x6.
6. Eyedropper Tool
Using this tool you can sample a color from any part of your image and then use it. Just get the eyedropper and click somewhere on your document window.
7. Healing Brush Tools
There are tools you can use for removing artifacts from your images. There are five different tools you can use here:
- Spot Healing Brush Tool - you just click, and Photoshop will sample the surrounding area and blend the artifact away.
- Healing Brush Tool - same as above, but this time you must push alt key and click on the are to get the sample you want. Photoshop won't do this automatically.
- Patch Tool - you do selection like the Lasso Tool and then drag it to the area that you wish to fill it with, and it will be patched.
- Content-Aware Move Tool - you select some pixels, drag them to a new position and let go - Photoshop will remove your selection and move it to your desired location.
- Red Eye Tool - quick and easy tool to remove a red-eye effect. Just click on the part of the image with someone's red eyes.
8. Brush Tools
There are tools that allow you to paint using a pencil or many different brushes. There are 4 different tools here:
- Brush Tool - just a brush. You can define its hardness, shape, texture, size,
- Pencil Tools - just a normal pencil to draw.
- Color Replacement Tool - this tool will allow you to colorize by replacing the original color of an image with the foreground color.
- Mixed Brush Tool - you can, using this tool, to blend colors and vary your wetness within a single brush stroke. So it's like an advanced Brush Tool.
9. Stamp Tools
There are two different stamp tools here:
- Clone Stamp Tool - hold alt key, click your sample area, then click another part of the image. It will clone image information to selected area from the sampled one.
- Pattern Stamp Tool - this is a brush-type tool to paint a pattern or texture on the image.
10. History Brush Tools
The History Brush Tool allows you to bring in details from another project by painting with an image state or a snapshot into a different layer. The Art History Brush Tool is basically the same, but it adds an effect with different settings.
11. Eraser Tools
There are tree different tools for erasing purposes:
- Eraser Tool - it can be used as a brush and will remove pixel information from current layer.
- Background Eraser Tool - drag this tool along the boundaries of the image background and it will try to remove it.
- Magic Eraser Tool - click in the image area and this tool will automatically try to remove the background based on criteria.
12. Paint Bucket Tool
The Paint Bucket Tool allows you to fill your layer or given part of an image with specified color. There is also the Gradient Tool which is doing the same, but instead the color it will fill your document using gradient.
13. Blur / Sharpen / Smudge Tools
All three options work similar to the brush.
- Blur Tool - this tool will blur part of your image, just click on the are you want to blur.
- Sharpen Tool - similar to the Blur Tool, but this time it will sharpen your image.
- Smudge Tool - this tool allows you to smudge pixels and push them around.
14. Dodge / Burn / Sponge Tools
All three tools can be used like a brush.
- Dodge Tool - using Dodge Tool you can lighten areas of the image.
- Burn Tool - using Burn Tool you can darker areas of the image.
- Sponge Tool - using Sponge Tool y ou can make the image more or less saturated.
15. Pen Tools
There are few Pen Tools, but all are used for similar things: to draw paths. Using Standard Pen Tool you can draw with the biggest precision. Freeform Pen Tool will draw similar as a pencil. Magnetic Pen Tool will let you draw a path that snaps to the edges of defined areas. You can use this tools to create complex shapes.
16. Type tool
Type Tool in the main Photoshop tool for writing texts.
17. Path Selection Tool
When you have a path (Pen Tools), the Path Selection Tool allow you o select and move whole path instead of just single points. The Direct Selection Tool allows you to select and move single points.
18. Shape Tools
Using this tools you can draw many different shapes: rectangles, rounded rectangles, ellipses, polygons, lines and other custom shapes (there are some standard custom shapes in Photoshop, you can install more if you will find them on the internet).
19. Hand Tool
The Hand Tool lets you move to any area of an image. If you need to use the Hand Tool quickly, just press space.
20. Zoom Tool
Just a tool to zoom in or out. If you click, it will zoom to the clicked area. You can also click and keep pressing left mouse button and then move your mouse - you will be able to zoom in and zoom out.
Conclusion
Photoshop is not an easy digital editor, but it's probably the best one. If you will keep learning basics and you will make a lot of practice, you will see that it can make a lot of amazing things quick and easy and there's almost nothing Photoshop cannot do.
-
-
Fshoq!16th March 2017, 16:13
Thank you, Mark. I will write more Photoshop tutorials soon, so be in touch.
-
-
RoRoRonald15th March 2017, 14:34
Such a wonderful blog! Every person can learn Photoshop basics here! Thanks!
-
Fshoq!31th March 2017, 10:44
Your welcome. Soon I will continue my Photoshop basics series, hope you will enjoy it too.
-
-
Yendi R.15th March 2017, 15:57
I love Photoshop and these tips are awesome! I am aware of a few of them but never used the Magic Wand and Sharpen Tool! I do not use Photoshop many times, but Im a photographer and I love to edit photographs. I found here some extra tips to make my knowledge better.
-
Fshoq!31th March 2017, 10:45
Its always good to learn something new, Im glad this article helped you with that.
-
-
Mason15th March 2017, 17:00
It covers the most popular Photoshop basics and tips without bombarding complicated terms, good job mate. If you want, you can always look for more detailed techniques in if you wish.
-
Fshoq!31th March 2017, 10:46
I tried my best writing this Photoshop basics article, thanks for appreciate that!
-
-
79Lloyd13th April 2017, 07:41 https://google.co.uk
I must say you have very interesting articles here. Your blog should go viral. You need initial traffic only. How to get it? Search for: Miftolos tools go viral
-
Unnamed12th May 2017, 13:57
When someone writes an paragraph he/she keeps the image of a user in his/her brain that how a user can understand it. Therefore thats why this piece of writing is perfect. Thanks!
-
Carol20th May 2017, 08:54
Hello to all, the contents present at this site are truly awesome for people experience, well, keep up the good work fellows.
-
great cool photoshop tutorials16th August 2017, 22:45
First of all I want to say terrific blog! I had a quick question which Id like to ask if you do not mind. I was curious to find out how you center yourself and clear your head before writing. Ive had a hard time clearing my thoughts in getting my ideas out there. I do take pleasure in writing however it just seems like the first 10 to 15 minutes are usually wasted just trying to figure out how to begin. Any recommendations or hints? Thank you!
-
Mark6th November 2017, 10:19
Excellent post. I was checking continuously this blog and Im impressed! Very helpful information specifically the last part :) I care for such info a lot. I was seeking this particular info for a very long time. Thank you and good luck.
-
Maria11th January 2018, 04:22
My partner and I stumbled over here coming from a different web page and thought I should check things out. I like what I see so now im following you. Look forward to exploring your web page again.
-
Mirek17th July 2018, 09:25
A great course and basics of Photoshop. It is a very difficult program, but somehow I slowly get the basic tools. This text was translated automatically. Original text is below: Śwetny kurs i podstawy Photoshopa. Co prawda to bardzo trudny program, ale jakoś powoli łapię podstawowe narzędzia.
-
zuzu5th March 2019, 16:44
This text was translated automatically. Original text is below: można , ale dłuuugo to trwa
-
Omnia2nd January 2020, 21:25 www.fotoomnia.pl
This text was translated automatically. Original text is below: Klarownie wytłumaczone wszystko to co potrzebne jest do rozpoczęcia przygody z Photoshopem. pozdrawiam
-
Dudek&Design4th April 2020, 09:43 www.dudekdesign.pl
This text was translated automatically. Original text is below: Jestem pod wrażeniem przydatnych treści w tym artykule. Szacunek, ponieważ wiem ile pracy w to włożyłeś. Super dla początkujących w świecie grafiki :)
-
Lashay17th February 2023, 04:16
Very good post! We are linking to this great article on our website. Keep up the great writing.


This is a very informative guide for Photoshop basics, fits my beginner needs. Thanks for writing.