

Lightroom tutorial #1: Basics

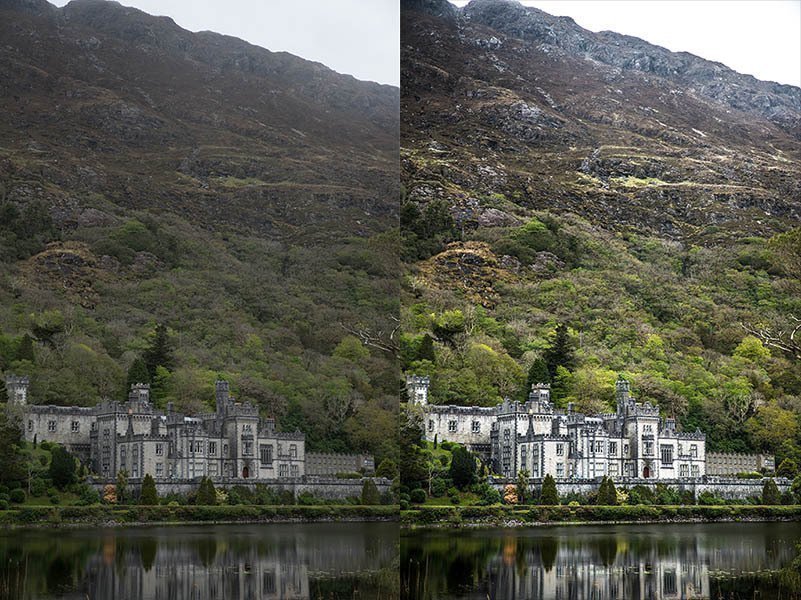
Lightroom is a program which allows you to easily organize and edit your photos. It's a perfect application for photographers, even for beginners. This Lightroom tutorial guide will show you how to import photos, user library and develop basics.
Welcome to the first lesson of a tutorial about Adobe Lightroom basics. I will write here about Lightroom interface, organize and photo edit basics.
What is Lightroom?
Lightroom is a photo management and photo editing software created especially for photographers. With this program, you will be able to import, organize, edit, export and share your photos. While there are a lot of different photo editing tools out there, Lightroom seems to be one of the best ones, giving photographers powerful and effective tool for their work.
Lightroom or Photoshop?
Before we begin, there is one question we need to ask. Why should I learn Lightroom, if there is much more advanced Photoshop, and I can still use Adobe Bridge to organize my photos?
Well, that's true, but if you are a photographer, Lightroom will be probably enough for your needs, and it's much more easy to learn (and cheaper) than Photoshop. If you think different, there is Photoshop basics tutorial, where you can start to learn. If you still want to stay with Lightroom, let's begin!
Interface overview
To understand how to use any program, you should be comfortable doing is navigating. Let’s go over the layout of Lightroom, there are four main parts of its interface.

1. Modules
There are 7 modules in Adobe Lightroom 6: Library, Develop, Map, Book, Slideshow, Print, and Web. You can always switch between them using selected buttons. The truth is that 90% of your time you will be using first two, the rest are just an add-ons for making books, slideshows or web gallery from your photos. You can also place your images on the map or print them. The two main modules are:
- Library - this is the place, where you import and organize your images. It’s also where you start by default when you launch the application.
- Develop - here the magic begins. You can edit your photos here.
2. Right panel
The right panel content depends on what module are you using. When you are in the library, you can write keywords, comments and other metadata for your photos that are useful for organization. You can also make here quick development on multiple photos.
When you are using develop module, you will find here the main tools like crop tool, brushes, basic photo settings (exposure, contrast, highlights, shadows...) and much more.
3. Left panel
Work same as the right panel, so its content depends on the module. While you are in Library mode, you can watch your catalogs and folders containing your photos.
While on Develop module, you can find here navigator (to see certain parts of the photo), presets (grouped photo edit settings) and history, which will allow you to go back as many steps as you want.
4. Main area
This is the main area of the Lightroom. While using Library mode, you will see here your current selected photos. Turning on you Develop module, you will see here photo to edit.
Library module
This is the place you can find all your Lightroom photos. There are advanced organize options: you can group photos into collections, you can write image metadata (title, copyrights etc.), add comments and keywords to them. If you have a lot of photos and want to use them in the future, you should definitely use all these options. When you will get some experience here, you will find out many things here can be automated.
How to import files?
If you want to import files, you must click on the "Import..." button on the bottom left corner of the library. After that, a new window will popup (you can see it in the given image), and here you can choose what images you want to import.
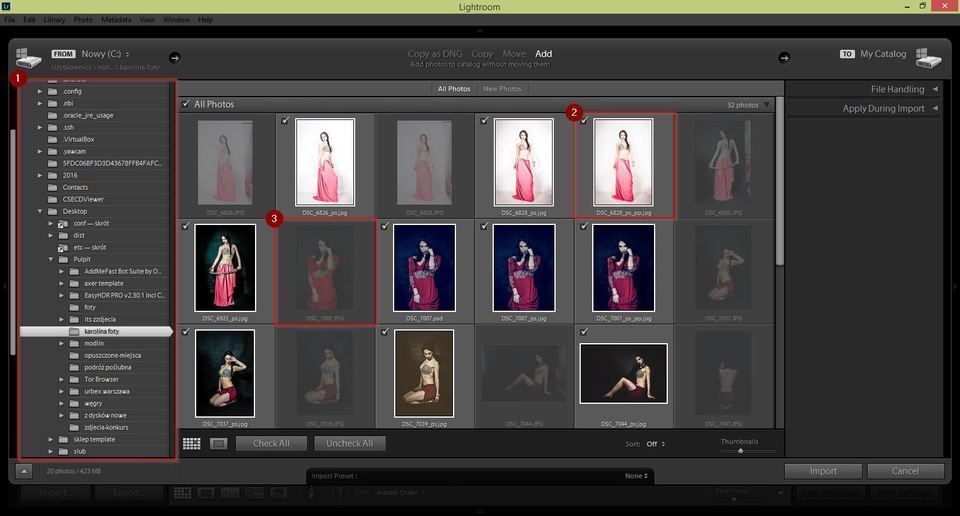
In the import window, you can find left sidebar (1), which allows you to browse your computer folders to find your photos to import. As you can see Lightroom by default check all your photos (like nr 2), you can also sometimes see grayed photos that cannot be checked (nr 3) - they are already imported to Lightroom.
Develop module
If you already imported your photos, it's time to make some magic. Select image you want to edit and change module to develop. This part of the program is also split into few sections.
Left panel
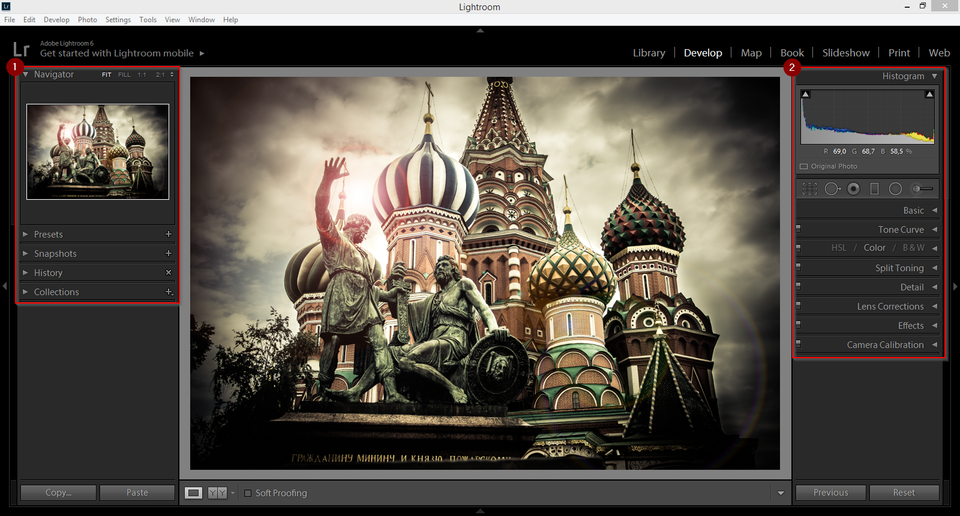
This panel is selected as a number 1 on the screen. You can find here a few useful options, I will try to explain them shortly below:
- Presets - here are some grouped effects you can use. There are some Lightroom's defaults, but you can create your own or install new ones.
- Snapshots - if you like your current effect, but you still want to see another one, you can save current as a snapshot - then you can always go back to it.
- History - every step you did during your photo post-process. It's awesome because you can go back to every step you did (Photoshop has limited history memory).
Right panel
Here are all the tools we use to edit photographs, so here the magic comes true. I will shortly describe them below:
- Histogram - color tones and a shadow and highlight clipping.
- Tool icons - below histogram you can find 6 different icons:
- Crop Overlay - you can crop your photos using this tool.
- Spot Removal - it will remove a part of image you choose and then Lightroom will try to fill that part using different part of photo
- Red Eye Correction - tool made to remove red eye effect.
- Graduated filter - allows you to apply edits across an even gradient.
- Radial filter - same as Graduated Filter, but this time your gradient will be radial.
- Adjustment Brush - the brush with many different adjustments (similar to Basic options below).
- Basic - you can change here basic options like exposure, contrast, highlights, darkness, clarity, saturation etc.
- ToneCurve - this is the adjustable curve that shows you shadows, darks, lights and ends with highlights of your photo.
- HSL / Color / B&W - you can manipulate here colors of your image.
- Split Toning - the process of adding different colors to the shadows and the highlights of an image.
- Detail - you can make your photo sharpen or less noisy here.
- Lens Corrections - this tool is used to correct various optical issues commonly seen on all lenses.
- Effects - vignette tool.
- Camera Calibration - you can calibrate here your photo with your screen by changing colors primary hue or saturation.
Conclusion
This all seems like a lot to remember, but with a little bit of practice, you will have a good understanding of basic Lightroom workflow. I hope this Beginner’s Guide to Lightroom was helpful. Please leave any thoughts or questions in the comments section below. Good luck!

My name is Wojtek and I am very happy that you came to my photography blog. I started my adventure with photography a few years ago and all I know, I learned myself, mainly from the Internet (which proves that for those who want nothing is difficult).
If you liked this article, be sure to leave a comment and read some more!
Read the next article in this series:
Lightroom tutorial #2: Basic adjustments and presets-
-
Fshoq!5th April 2017, 16:19
Thank you, Gerda. Soon I will write more Lightroom tutorials, so keep in touch!
-
-
Mark S.13th April 2017, 14:40
Very good article, I just starting to learn basics of Lightroom and it was exactly what I needed. Regards and Im waiting for more informative articles like this.
-
Carla15th April 2017, 11:42
Lightroom is a very good program for photo edition. Maybe I will learn one day Photoshop, but for now, it is enough.
-
Noname18th May 2017, 11:44
My relatives always say that I am killing my time here at web, however I know I am getting know-how daily by reading thes good articles.
-
Regis17th September 2017, 19:17
It is appropriate time to make some plans for the future and its time to be happy. Ive read this post and if I could I wish to suggest you some interesting things or tips. Maybe you can write next articles referring to this article. I want to read even more things about it!
-
puppy11th November 2017, 14:40
I have read so many content about the blogger lovers but this paragraph is in fact a nice paragraph, keep it up.
-
Korona11th January 2018, 03:24
My brother recommended I may like this blog. He was entirely right. This submit actually made my day. You cannt imagine just how a lot time I had spent for this info! Thank you!
-
Żaneta17th July 2018, 09:35
Lightroom is actually a program for beginners, although it can be really great effects, especially if you practice a bit. So brushes in the hand and paint after your photos, I succeeded :-) This text was translated automatically. Original text is below: Lightroom to rzeczywiście program dla początkujących, aczkolwiek można nim zrobić naprawdę świetne efekty, szczególnie, jak już się trochę poćwiczy. Tak więc pędzle w dłoń i malować po swoich zdjęciach, mi się udało :-)
-
Olly Gaspar24th October 2019, 17:04 weseektravel.com
Ive seen so many beginner guides to Lightroom but you nailed this one. I was considering writing one myself but theres no need when youve already covered everything 😂
-
Agnieszka8th June 2020, 17:28
This text was translated automatically. Original text is below: Na reszcie ktoś po polsku, jasno, prosto i za darmo to wytłumaczył. Dziękuję :)
-
Andrzej Wypych23th January 2021, 14:51
This text was translated automatically. Original text is below: Naprawdę dobre kursy, proso wyjaśniane i zachęcające do dalszej eksploracji tego oprogramowania, szukam teraz informacji jak zmieniać moduły, na zainstalowanym programie uruchamia mi się bez paska umożliwiającego zmianę trybu ekranu i co za tym idzie zmiany modułu, jeszcze nie wiem co jest przyczyną , idę dalej, może w końcu się dowiem :-)) Andrzej PS jestem super początkujący :-)
-
Wiesław15th January 2022, 21:42
This text was translated automatically. Original text is below: dlaczego w prawym panelu Develop mam tylko 4 ikony narzędzi? brak nap. gradientu i pędzla
-
Fshoq!17th January 2022, 16:51
This text was translated automatically. Original text is below: Być może starsza wersja Lightrooma? Szczerze mówiąc nigdy się z tym nie spotkałem, od kiedy pamiętam (a korzystam z Lightrooma od wielu lat) narzędzia te zawsze były po prawej stronie..
-
Wiesław17th January 2022, 19:42
This text was translated automatically. Original text is below: u mnie też są po prawej stronie, ale tylko 4 ikonki. Nie wiem jaka wersja, ale dopiero zakupiłem pakiet Adobe, więc powinno być ok. To samo jest w Lightroom i Lightroom Clasic.
-
-
-
Kasia13th February 2022, 11:33
This text was translated automatically. Original text is below: Bardzo dobry artykuł. Właśnie zaczynam moją przygodę z tym programem i to było to czego mi potrzeba. Wszystko wytłumaczone w bardzo jasny i przystępny sposób. Czekam na dalsze lekcje :)
-
Alisa Lira17th February 2022, 06:26
There are many basic lightroom tutorial on the internet. But i find this one is informative and easier to understand.
-
fashion report ffxiv this week27th March 2022, 23:10
Write more, thats all I have to say. Literally, it seems as though you relied on the video to make your point. You clearly know what youre talking about, why throw away your intelligence on just posting videos to your weblog when you could be giving us something informative to read?


I just started my journey with Lightroom, this tutorial showed me some basic tips, thanks! :-)